I used this product this past Saturday. My entire house squeaks, it is so bad it would wake up the entire family when someone walks around in any room. I have hardwood floors in most of the house and carpet in the bedrooms so in master I decided to try it first. It started out slow as I was not hitting the joist as the instructions say to do. I have a pop out ceiling in my basement so I could see the fact that i was missing the joist so it made it easier then some others may find. Once I was lined up it went pretty easily. I started spacing them about 3 inches away from each other but that was using a lot of screws So I then decided to go about 8 inches apart and it managed to do a great job and save a lot of screws.I left the heads on all the screws until the very end, that way if i needed to add more I could determine where to do so. I did add about 5 screws at the end as I still had minor squeaks. It was so nice to walk around the room and not hear a single squeak. Now I have to try to work on the hardwood floors but i wanted to practice in bedroom first. The head broke off very easily by the way. Depending on how much area you need I would recommend getting extra screws. I used this entire kit and used maybe 10 additional screws for one bedroom but it would depend on the size of the area. I would say just start by spacing them out far apart like a 8 inches to 12 inches and go back in fill in where you need so you don't waste material. GREAT PRODUCT
It works, period; some advice... Test drill on scrap wood to find best sizes drill bit, and if possible, scrap wood should be same wood and age as your floor. If bit is too small, screw will snap too early leaving a screw without a head, only vice grips will remove it. For finding floor joists, I used 1/8 drill bit, but after much trial/error my floor looked like Swiss cheese, so I ate some (kidding), so switched to 6" long 1/16" drill bit for finding joist, makes smaller holes easy to fill. When repairing squeak, use at least 4 screws few inches apart; one screw is not enough, squeak will come back within hours.
Squeaks and floor noise can happen for a variety of reasons, from lack of humidity to improper or older subfloors just loosening over time. This product worked well to fix our subfloor squeaking by tightly reattaching it to the joists. The hardest part is finding where the joists are. They tend to run 16 inches apart so if you find one, the next one is quick. We actually used a wall stud finder on hardwood flooring outside the carpeted room to help us narrow in on where they might be (the stud finder had no luck through carpet). We followed the directions (there's some good videos online as well) and after locating the joists, inserting a few screws, and snapping them off the problem was completely solved. There is no sign of damage to the carpet, and the screws snapped so we cannot feel them no matter how hard we press over them. Overall, this is a quick, inexpensive fix that is far less messy than many other options. I'd recommend this product and think it's worth a try before removing flooring or subflooring to solve this issue.
1:09 0:00 This video is not intended for all audiences. What date were you born? JanuaryFebruaryMarchAprilMayJuneJulyAugustSeptemberOctoberNovemberDecember12345678910111213141516171819202122232425262728293031201920182017201620152014201320122011201020092008200720062005200420032002200120001999199819971996199519941993199219911990198919881987198619851984198319821981198019791978197719761975197419731972197119701969196819671966196519641963196219611960195919581957195619551954195319521951195019491948194719461945194419431942194119401939193819371936193519341933193219311930192919281927192619251924192319221921192019191918191719161915191419131912191119101909190819071906190519041903190219011900 Submit Adobe Flash Player is required to watch this video. Install Flash Player Worked like a charm. Subfloor was squeaking, I used a stud finder and a tape measure to find the joists (which in most cases run front to back). Pumped in 6 screws and the squeak is gone! I did practice on a spare piece of carpet and wood to get the feel of it. Toughest part was pulling the top of the screw out after breaking it, just wiggle it and be a little patient.
OMG ITS BRILLIANT! I was skeptical but desperate. We had a horrible popping squeaking groaning spot in our carpeted upstairs bedroom floor since we bought the house. Over 2 years i swear it spread. You couldnt take a step ANYWHERE in the room and not be heard throughout the house. I have video of before and after (when i figure out how, I'll upload it). Finding the joist near it was the hardest part. (Google how). Once that screw went through it IT STOPPED IMMEDIATELY! I then measured hiw far from the wall i was and did one every 10 inches on the same joist (again, the whole room squeaked by then) each time i would stand up and step and HAPPY DANCE like a crazy person!!. I literally walked around the house looking for squeaks. I've now done the the carpeted stairs (8 out of 12 squeaked). Tomorrow im doing one in the hardwood and one in the laminate. Looks trickier but I'm not scared now. If the inventer were here i would KISS THEM! also, because I know nothing about Construction and assumed i could just measure the 16 inches, I drilled 10 screws in the area until I finally hit a joist, but i would give $1,000 if you could tell me where even 1 was. AMAZING! Zero damage. Tip: when snapping off the heads, think bottle top. Easy peasy:(
I believe I should be the spokes person for this product. For the people who put it didn't work I say make sure you hit the joist. If you are having problems try using a deep stud finder with the capability to find wires and plumbing so you do not make a costly mistake and try to sue this brilliant company for their beautiful product they've come up with. E. B jr is not an employee nor is affiliated with O'BERRY ENETERPRISES that is of coarse they would like to hire my beautiful self to make commercials. By the way I no longer need to take a detour late at night when I'm hanging out with my wife around the couch as not to wake up my "Mommy Daddy alone time spoilers"...even though I and my wife love our children very much.
This kit does its job very well. I used all fifty screws in one small upstairs-carpeted bedroom and actually ran out of the screws quicker than I expected. It did a great job quieting the majority of the floor. A hint for the real do-it-yourself'ers, I quickly learned all you need to accomplish this task is the scored screws and a pair of pliers. You learn after your first couple screws that you don't necessarily need the base to do anything, It just helps if you can't control yourself with the screw-gun. In fact for my extra screws that I need, I may just score some wood screws real quick with a hacksaw or dremel. Good luck!
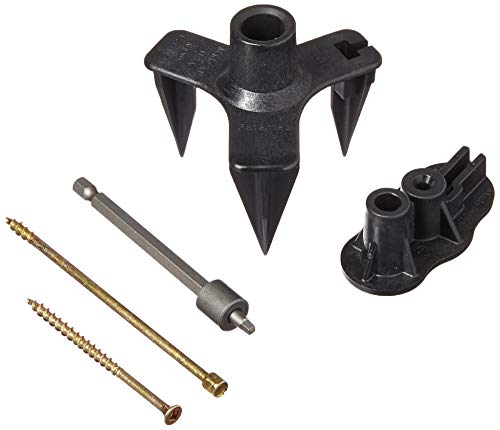
Wow, this tool worked great. I was able to fix several squeaks under a carpeted floor. I spent more time looking the floor joist than actually driving the screws into the joist to fix the squeaks. The joist finder provided in the kit worked well except that the hexagon shaft (which goes into the drill) is not quite long enough and kept disengaging from my drill chuck. I also tried to fix a squeak under a linoleum floor but I was unsuccessful. The screw did not break off as advertised, but I suspect that's because I was not in a floor joist. I was unable to find the joist using my ultrasonic stud finder, and you can't use the joist finder provided in this kit for a linoleum floor. The screw also left a hole in the linoleum. So, I wouldn't recommend it for that, but over carpet it worked like a charm.
0:00 0:00 This video is not intended for all audiences. What date were you born? JanuaryFebruaryMarchAprilMayJuneJulyAugustSeptemberOctoberNovemberDecember12345678910111213141516171819202122232425262728293031201920182017201620152014201320122011201020092008200720062005200420032002200120001999199819971996199519941993199219911990198919881987198619851984198319821981198019791978197719761975197419731972197119701969196819671966196519641963196219611960195919581957195619551954195319521951195019491948194719461945194419431942194119401939193819371936193519341933193219311930192919281927192619251924192319221921192019191918191719161915191419131912191119101909190819071906190519041903190219011900 Submit Adobe Flash Player is required to watch this video. Install Flash Player Love this product. I have hardwood floors upstairs and this did the trick to get rid of the squeaks. I do agree with some of the others that there are squeaks caused by the wall but I put a few if these screws in the floor near the wall that squeaked and got rid of that squeak as well. The instructions are not that good, so here are my quick tips. 1. Test in a closet so if you mess up its not visible (note the wood filler will still make the hole disappear.) 2. In the closet start with a 1/8 drill bit and the hard wood floor adapter if the screw breaks great! If not back it out and use the softwood adapter. Consider this hole a lost cause and just break the head off with the tool. This doesn't necessarily mean you have softwood floors so a few more test holes 3. Next reduce your drill bit size and try the hardwood adaptor once more. If it doesn't break, just like in tip 2, back it out and put it in using the softwood adapter, break it off and fill the hole. Keep doing this until eventually your hardwood adaptor causes the screw to snap and now you know which drill bit to use. 4. If even the smallest drill bit you have does not cause the screw to snap in the hardwood adaptor, then your only choice is to use the softwood adaptor. I would still recommend using drill bits less than 1/8 for softwood as I've found more success I'm getting rid ofy squeaks. 5. the instructions say to drill 2 and 1/2 or 1/4 inch (can't remember). Personally I just went through the wood floor (my wood floors were about 1/4 inch thick) and not the subfloor, again this seemed to help get rid of squeaks more for me than drilling the full 2+ inches recommended. 6. As confusing as the directions are, you do not need to drill into joists if your using this product on wood floors. If you're lucky enough to find one great but I had success otherwise. Note that a stud finder does not work so don't waste your money. You can try the knock method and listen for sounds but after spending hours knocking I just went for it and started drilling holes. 7. Don't be afraid of drilling holes, I think the apprehension of drilling intoy holes is what turned this project into a multiple hour project instead of the 10-15 min it should be. Once you get the feel for drilling the hole, putting the screw, snapping it and filling it it will go so much faster. Therefore I do recommend getting the right wood filler stick first so you can make sure it looks good. I used varathame fill sticks (see video).
Ok, there's the deal: - Does it solve the problem of squeaky floor? YES, my floors are quite and sturdy after the remedy. - Is it easy to use? YES, it takes my couple of try-outs to locate the joist and some learning to break the screw using the tool provided, but I managed to make a room non-squeaky within 1.5 hours (including learning how to use it). - Is the tool set perfect? No, it would be nice if the break-out tool piece (the tripod) is made of metal instead of plastic. It would be nice if they could design the joist finder better so it won't slip out of my screw driver's slot. - Is it worth it? Absolutely YES! This is the ONLY solution in the market without tearing down the whole room. In summary, it works! and I recommend it!
ScienceGeek Kinetic Art Asteroid - Electronic Perpetual Motion Desk Toy Home Decoration Toys-Games Previous Next Get It On BestProducts Features: It is a nice gift, we can send it to our friends, children, family.Sleek desk toy for adults and children Versatile - an exquisite decoration that can be placed in house,school or office Funny and useful for those kids who want to learn more about magnet and physics. It is made of metal and pl...
Sagittarius Now 22 − Dec 21 Alias: Alias: The Archer September 19 (19/09) daily sagittarius horoscope: summary sagittarius daily Star 8/10 You might struggle to resist saying the words, I told you so, but make an effort to summon restraint. Its unlikely that someone doubted your view of a certain situation, they probably wanted to explore an alternative option to see what a result might be. You know your prediction was right. Someone is about to discover this, too. Keep this victory to yourself and move on. Read more... summary sagittarius tomorrow Star 7/10 Your professional goals are about to become a top priority as you become blessed with a sharper vision for all things work-related, thanks to todays New Moon in Virgo. Be aware though of how your quest for excellence could fa...
Learning Resources LER0744 Three Bear Family Counter Set, Rainbow, Set of 96 Toys-Games Previous Next Get It On BestProducts Features: These plastic bears come in three sizes, three weights and six colors Help children understand abstract math concepts with hands-on bear manipulatives Bears are proportionally weighted to use on a balance for measurement 96-piece set includes 24 Papa, 24 Mama and 48 Baby Bear counters, storage container,...


Amanda Rauscher
Works Great, Space out your screws.
I used this product this past Saturday. My entire house squeaks, it is so bad it would wake up the entire family when someone walks around in any room. I have hardwood floors in most of the house and carpet in the bedrooms so in master I decided to try it first. It started out slow as I was not hitting the joist as the instructions say to do. I have a pop out ceiling in my basement so I could see the fact that i was missing the joist so it made it easier then some others may find. Once I was lined up it went pretty easily. I started spacing them about 3 inches away from each other but that was using a lot of screws So I then decided to go about 8 inches apart and it managed to do a great job and save a lot of screws.I left the heads on all the screws until the very end, that way if i needed to add more I could determine where to do so. I did add about 5 screws at the end as I still had minor squeaks. It was so nice to walk around the room and not hear a single squeak. Now I have to try to work on the hardwood floors but i wanted to practice in bedroom first. The head broke off very easily by the way. Depending on how much area you need I would recommend getting extra screws. I used this entire kit and used maybe 10 additional screws for one bedroom but it would depend on the size of the area. I would say just start by spacing them out far apart like a 8 inches to 12 inches and go back in fill in where you need so you don't waste material. GREAT PRODUCT
Anna Dove Frankos
Squeak be GONE!
It works, period; some advice... Test drill on scrap wood to find best sizes drill bit, and if possible, scrap wood should be same wood and age as your floor. If bit is too small, screw will snap too early leaving a screw without a head, only vice grips will remove it. For finding floor joists, I used 1/8 drill bit, but after much trial/error my floor looked like Swiss cheese, so I ate some (kidding), so switched to 6" long 1/16" drill bit for finding joist, makes smaller holes easy to fill. When repairing squeak, use at least 4 screws few inches apart; one screw is not enough, squeak will come back within hours.
Victor Cassara
Be patient, but they work for subfloor squeaks
Squeaks and floor noise can happen for a variety of reasons, from lack of humidity to improper or older subfloors just loosening over time. This product worked well to fix our subfloor squeaking by tightly reattaching it to the joists. The hardest part is finding where the joists are. They tend to run 16 inches apart so if you find one, the next one is quick. We actually used a wall stud finder on hardwood flooring outside the carpeted room to help us narrow in on where they might be (the stud finder had no luck through carpet). We followed the directions (there's some good videos online as well) and after locating the joists, inserting a few screws, and snapping them off the problem was completely solved. There is no sign of damage to the carpet, and the screws snapped so we cannot feel them no matter how hard we press over them. Overall, this is a quick, inexpensive fix that is far less messy than many other options. I'd recommend this product and think it's worth a try before removing flooring or subflooring to solve this issue.
Itsnot Youme
Amazing results with video proof!
1:09 0:00 This video is not intended for all audiences. What date were you born? JanuaryFebruaryMarchAprilMayJuneJulyAugustSeptemberOctoberNovemberDecember12345678910111213141516171819202122232425262728293031201920182017201620152014201320122011201020092008200720062005200420032002200120001999199819971996199519941993199219911990198919881987198619851984198319821981198019791978197719761975197419731972197119701969196819671966196519641963196219611960195919581957195619551954195319521951195019491948194719461945194419431942194119401939193819371936193519341933193219311930192919281927192619251924192319221921192019191918191719161915191419131912191119101909190819071906190519041903190219011900 Submit Adobe Flash Player is required to watch this video. Install Flash Player Worked like a charm. Subfloor was squeaking, I used a stud finder and a tape measure to find the joists (which in most cases run front to back). Pumped in 6 screws and the squeak is gone! I did practice on a spare piece of carpet and wood to get the feel of it. Toughest part was pulling the top of the screw out after breaking it, just wiggle it and be a little patient.
Edward Rush
Yes and YES. ANYONE can do this! Amazing.Thank You!
OMG ITS BRILLIANT! I was skeptical but desperate. We had a horrible popping squeaking groaning spot in our carpeted upstairs bedroom floor since we bought the house. Over 2 years i swear it spread. You couldnt take a step ANYWHERE in the room and not be heard throughout the house. I have video of before and after (when i figure out how, I'll upload it). Finding the joist near it was the hardest part. (Google how). Once that screw went through it IT STOPPED IMMEDIATELY! I then measured hiw far from the wall i was and did one every 10 inches on the same joist (again, the whole room squeaked by then) each time i would stand up and step and HAPPY DANCE like a crazy person!!. I literally walked around the house looking for squeaks. I've now done the the carpeted stairs (8 out of 12 squeaked). Tomorrow im doing one in the hardwood and one in the laminate. Looks trickier but I'm not scared now. If the inventer were here i would KISS THEM! also, because I know nothing about Construction and assumed i could just measure the 16 inches, I drilled 10 screws in the area until I finally hit a joist, but i would give $1,000 if you could tell me where even 1 was. AMAZING! Zero damage. Tip: when snapping off the heads, think bottle top. Easy peasy:(
Jasmin Lingad
If you are having problems try using a deep stud finder with the capability to find wires and plumbing so you do not make a costly mistake and try to sue this brilliant company for their beautiful product they've come up with
I believe I should be the spokes person for this product. For the people who put it didn't work I say make sure you hit the joist. If you are having problems try using a deep stud finder with the capability to find wires and plumbing so you do not make a costly mistake and try to sue this brilliant company for their beautiful product they've come up with. E. B jr is not an employee nor is affiliated with O'BERRY ENETERPRISES that is of coarse they would like to hire my beautiful self to make commercials. By the way I no longer need to take a detour late at night when I'm hanging out with my wife around the couch as not to wake up my "Mommy Daddy alone time spoilers"...even though I and my wife love our children very much.
Sarah McMurrough
It did a great job quieting the majority of the floor
This kit does its job very well. I used all fifty screws in one small upstairs-carpeted bedroom and actually ran out of the screws quicker than I expected. It did a great job quieting the majority of the floor. A hint for the real do-it-yourself'ers, I quickly learned all you need to accomplish this task is the scored screws and a pair of pliers. You learn after your first couple screws that you don't necessarily need the base to do anything, It just helps if you can't control yourself with the screw-gun. In fact for my extra screws that I need, I may just score some wood screws real quick with a hacksaw or dremel. Good luck!
Freelanc King
Great for Fixing Squeaks Under Carpeted Floor
Wow, this tool worked great. I was able to fix several squeaks under a carpeted floor. I spent more time looking the floor joist than actually driving the screws into the joist to fix the squeaks. The joist finder provided in the kit worked well except that the hexagon shaft (which goes into the drill) is not quite long enough and kept disengaging from my drill chuck. I also tried to fix a squeak under a linoleum floor but I was unsuccessful. The screw did not break off as advertised, but I suspect that's because I was not in a floor joist. I was unable to find the joist using my ultrasonic stud finder, and you can't use the joist finder provided in this kit for a linoleum floor. The screw also left a hole in the linoleum. So, I wouldn't recommend it for that, but over carpet it worked like a charm.
Heather Reed
Definitely works, just takes patience and practice.
0:00 0:00 This video is not intended for all audiences. What date were you born? JanuaryFebruaryMarchAprilMayJuneJulyAugustSeptemberOctoberNovemberDecember12345678910111213141516171819202122232425262728293031201920182017201620152014201320122011201020092008200720062005200420032002200120001999199819971996199519941993199219911990198919881987198619851984198319821981198019791978197719761975197419731972197119701969196819671966196519641963196219611960195919581957195619551954195319521951195019491948194719461945194419431942194119401939193819371936193519341933193219311930192919281927192619251924192319221921192019191918191719161915191419131912191119101909190819071906190519041903190219011900 Submit Adobe Flash Player is required to watch this video. Install Flash Player Love this product. I have hardwood floors upstairs and this did the trick to get rid of the squeaks. I do agree with some of the others that there are squeaks caused by the wall but I put a few if these screws in the floor near the wall that squeaked and got rid of that squeak as well. The instructions are not that good, so here are my quick tips. 1. Test in a closet so if you mess up its not visible (note the wood filler will still make the hole disappear.) 2. In the closet start with a 1/8 drill bit and the hard wood floor adapter if the screw breaks great! If not back it out and use the softwood adapter. Consider this hole a lost cause and just break the head off with the tool. This doesn't necessarily mean you have softwood floors so a few more test holes 3. Next reduce your drill bit size and try the hardwood adaptor once more. If it doesn't break, just like in tip 2, back it out and put it in using the softwood adapter, break it off and fill the hole. Keep doing this until eventually your hardwood adaptor causes the screw to snap and now you know which drill bit to use. 4. If even the smallest drill bit you have does not cause the screw to snap in the hardwood adaptor, then your only choice is to use the softwood adaptor. I would still recommend using drill bits less than 1/8 for softwood as I've found more success I'm getting rid ofy squeaks. 5. the instructions say to drill 2 and 1/2 or 1/4 inch (can't remember). Personally I just went through the wood floor (my wood floors were about 1/4 inch thick) and not the subfloor, again this seemed to help get rid of squeaks more for me than drilling the full 2+ inches recommended. 6. As confusing as the directions are, you do not need to drill into joists if your using this product on wood floors. If you're lucky enough to find one great but I had success otherwise. Note that a stud finder does not work so don't waste your money. You can try the knock method and listen for sounds but after spending hours knocking I just went for it and started drilling holes. 7. Don't be afraid of drilling holes, I think the apprehension of drilling intoy holes is what turned this project into a multiple hour project instead of the 10-15 min it should be. Once you get the feel for drilling the hole, putting the screw, snapping it and filling it it will go so much faster. Therefore I do recommend getting the right wood filler stick first so you can make sure it looks good. I used varathame fill sticks (see video).
Carol Johnson Turner
Works well and highly recommend it!
Ok, there's the deal: - Does it solve the problem of squeaky floor? YES, my floors are quite and sturdy after the remedy. - Is it easy to use? YES, it takes my couple of try-outs to locate the joist and some learning to break the screw using the tool provided, but I managed to make a room non-squeaky within 1.5 hours (including learning how to use it). - Is the tool set perfect? No, it would be nice if the break-out tool piece (the tripod) is made of metal instead of plastic. It would be nice if they could design the joist finder better so it won't slip out of my screw driver's slot. - Is it worth it? Absolutely YES! This is the ONLY solution in the market without tearing down the whole room. In summary, it works! and I recommend it!